Video lag is a common issue many users face while playing videos on VLC Media Player on Windows. Various factors, including high-quality videos, insufficient system resources, or hardware acceleration, can cause it.
Video lag can cause a delay in the video’s playback, making it difficult to enjoy the content smoothly.
Fixing video lag is crucial for a better viewing experience. It can enhance the overall video quality and make it easier to follow the content without interruptions.
This article will discuss some effective methods to fix video lag in VLC video player on Windows. By implementing these methods, users can enjoy their videos without lagging issues.
Lower the Video Quality
Key things to consider about lowering the video quality.
High-Quality Videos Causing Lag
High-quality videos require more processing power, which can cause video lag in VLC video player on Windows.

The player may need help to keep up with the high demand, resulting in choppy or delayed playback.
Steps to Lower Video Quality
To lower the video quality, users can follow these steps:
- Open VLC media player on Windows.
- Choose Preferences under Tools in the top menu bar.
- The Input/Codecs tab in the Preferences window should be chosen.
- Under the Input/Codecs settings, find the option for Hardware-accelerated decoding and disable it.
- Restart VLC media player after saving the modifications.
- Try playing the video again and see if the lagging issue has been resolved.
Disabling Hardware-Accelerated Decoding
Disabling hardware-accelerated decoding can reduce the load on the system’s hardware, allowing the player to process videos more efficiently.
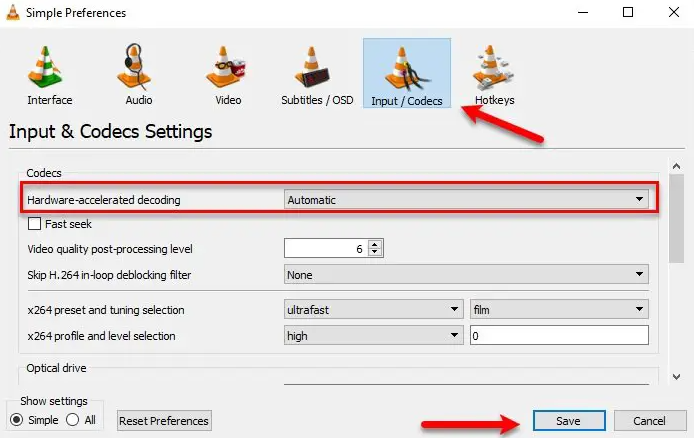
By doing so, the player will use software decoding instead, which can improve video playback performance.
See Also: How to Download Minecraft Free (Actual Method)
Increase the Caching Value
Key things to consider about increasing the caching value:
Caching and Its Importance
Caching is a process that temporarily stores data in the system’s memory to reduce the time it takes to access the data. In VLC video player, caching is vital in ensuring smooth video playback.
When a video is played, VLC caches a certain amount of the video data before starting the playback to ensure a constant stream of data for playback.
The Default Caching Value Is Not Enough
The default caching value may not be enough to handle high-quality videos, resulting in video lag. Users can increase the caching value to help the player to store more data in the memory, resulting in smoother video playback.
Steps to Increase the Caching Value
To increase the caching value, users can follow these steps:
- Open VLC Media Player on Windows.
- Then, choose Preferences under Tools in the top menu bar.
- Choose the Input/Codecs tab in the Preferences window.
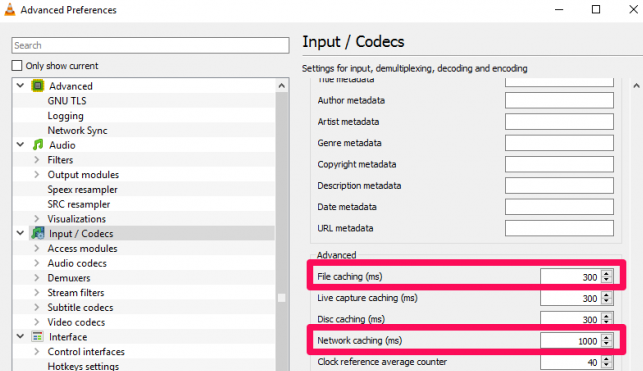
- Under the Input/Codecs settings, find the option for caching.
- After that, increase the caching value to a higher value (e.g., 1500ms).
- Restart VLC Media Player after saving the modifications.
- Lastly, try playing the video again and see if the lagging issue has been resolved.
Increasing the caching value will ensure that the video data is stored in the system’s memory for longer, allowing the player to access it more quickly and reducing video lag.
However, users should note that increasing the caching value may also increase the time it takes for the video to start playing initially.
Also Read: Best Graphics Card for Gaming in 2023
Disable Hardware Decoding
Key things to consider about disabling the hardware decoding.
Hardware Decoding Causing Video Lag
Hardware decoding is a process where a video is decoded using the system’s hardware instead of software. Although hardware decoding can provide faster and more efficient video playback, it can also cause video lag in VLC Media Player on Windows.
This is because hardware decoding requires more system resources and may cause conflicts with other applications running on the system, resulting in lagging issues.
Steps to Disable Hardware-Accelerated Decoding
To disable hardware-accelerated decoding, users can follow these steps:
- Open VLC Media Player on Windows.
- Then, choose Preferences under Tools in the top menu bar.
- Choose the Input/Codecs tab in the Preferences window.
- Under the Input/Codecs settings, find the option for Hardware-accelerated decoding and disable it.
- After that, restart VLC Media Player after saving the modifications.
- Try playing the video again and see if the lagging issue has been resolved.
Disabling hardware decoding will force VLC to use software decoding, which may be slower but can help reduce video lag.

By doing so, the player will use less of the system’s resources, allowing it to process videos more efficiently and reducing the risk of conflicts with other applications running on the system.
See Also: Epic Games Fortnite New Tips and Tricks
Close Other Programs
Key things to consider about closing other programs.
Other Programs Using System Resources
Other programs running on the system can use up system resources, such as CPU and RAM, leading to video lag in VLC Media Player on Windows.
This is because VLC may not have enough resources to process the video data efficiently, resulting in choppy or delayed playback.
Importance of Closing Programs to Reduce Video Lag
Closing other programs while playing videos in VLC video player is essential to reduce video lag. Doing so allows the player to use more of the system’s resources, resulting in smoother video playback.
Steps to Close Other Programs
To close other programs, users can follow these steps:
- Press Ctrl + Alt + Delete on the keyboard to open the Task Manager.
- Then, find the programs that use many system resources, such as CPU and RAM.
- Choose End Task by clicking on the application.
- Repeat steps 2 and 3 for other programs that use many system resources.
- After that, close the Task Manager.
- Restart VLC Media Player.
- Lastly, try playing the video again and see if the lagging issue has been resolved.
Closing other programs will free up system resources, allowing VLC video player to use more resources for processing video data efficiently, resulting in smoother playback.
However, users should note that some programs, such as antivirus software, may need to run in the background for security reasons.
Download VLC Media Player: Windows | iOS | Android
Final Thought
To sum up, video lag in VLC Media Player on Windows can be caused by factors such as high-quality videos, default caching value, hardware decoding, and other programs running on the system. To fix video lag issues, users can lower the video quality, increase the caching value, disable hardware decoding, and close other programs.
By following these steps, users can ensure their video playback experience on VLC video player is smooth and enjoyable. However, it is also essential to remember that these steps may only sometimes work for some videos and that other factors, such as outdated drivers or faulty hardware, may cause video lag issues.